Calcium Clay Substrate FAQ and How To
Thanks for the interest in our calcium clay substrate.
Before we begin, we’d like to thank Doug Hollister (Pumilo on Dendroboard) for sharing his knowledge and experience with us and the rest of the dart frog community. To make our calcium clay substrate, we follow the recipe on Dendroboard developed by Doug along with other experienced hobbyists over a decade ago.
We have tried to source the best ingredients and to produce the best quality substrate for our frogs, and now for your frogs. Since we began selling this substrate we have received many messages, both from those thinking of buying and those who already have some in hand, concerning the use and benefits of calcium bearing clay. We’ll try to address some of the most common ones here in hopes of helping you with any questions or uncertainties you may have.
Why use calcium bearing clay as a substrate in my vivarium?
The clay, particularly the calcium bentonite component, contains calcium and other trace minerals that should be beneficial to the frogs that we keep. The frogs can absorb these minerals by coming into direct skin contact with the clay as well as by consuming prey items that have been living in the clay. This can be particularly important when raising young frogs of small species that may have trouble taking supplement dusted fruit flies. It is also very helpful for obligate species that are initially raised in the parent’s tank. These froglets may go unnoticed for some time or be difficult to tell for certain that they are getting supplemented food items. The concept of calcium bearing clay substrate came about originally (by people much smarter than myself) to try and help deal with the issue of many Oophaga species mysteriously dying/disappearing within a few months after metamorphosis.
How should I use this clay substrate in my vivarium?
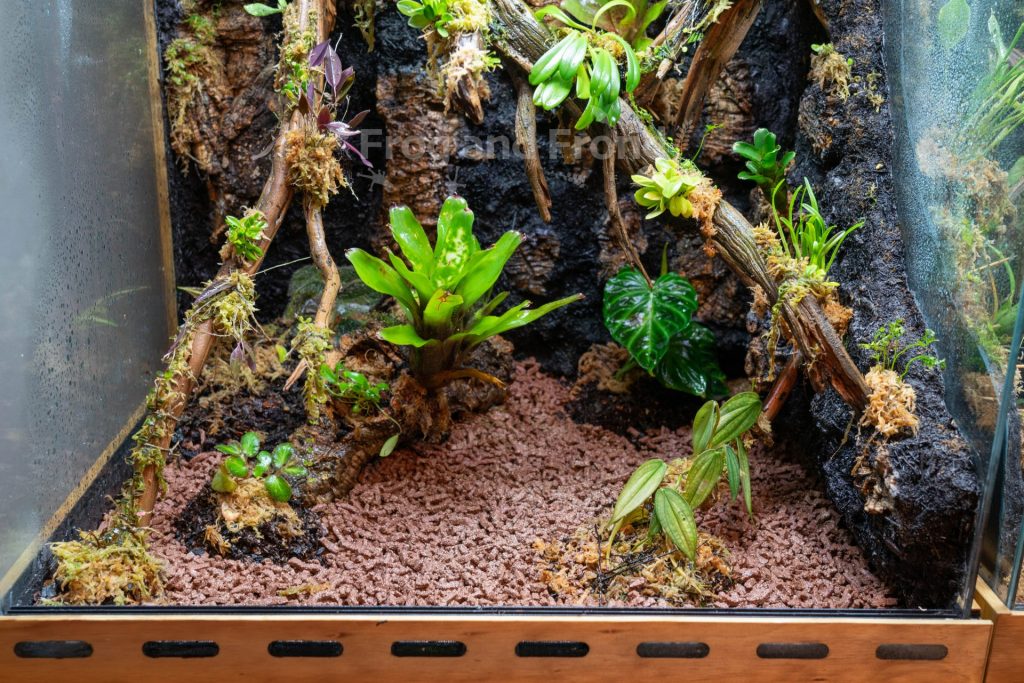
Calcium bearing clay is not a cheap substrate so it wouldn’t make sense to fill up the entire bottom of your tank several inches deep with it. We recommend using a less expensive fired clay product such as Turface to fill in most of the depth of your substrate layer and then add your calcium clay as the top layer. Just a solid layer of less than an inch is all that is necessary to give a functional surface that your frogs and microfauna will come into contact with. We suggest Turface instead of ABG because it is not organic and will make less of a mess mixing with the wet clay. Also the organics in something like ABG which are normally acidic could cause some of the calcium in the clay substrate to become chemically bound up and less accessible to your animals. Turface costs less too. If you are adding your clay to a tank that is already using ABG as the primary substrate it is ok to add a layer on top. Just try to mix the two as minimally as possible. If I am setting up a new tank with Turface and calcium clay then I will still add a couple handfuls of ABG around the roots of my terrestrial plants.
Adding clay substrate to the viv:
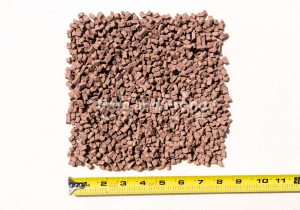 As mentioned above you only need a layer of clay on top of a “spacer” substrate. 1 pound of clay can be spread out to cover an area of about 8×8 inches. Once you have your clay in place, mist it heavily. The clay gets to you completely dry and is capable of absorbing a good bit of moisture. You may want to mist it thoroughly a couple of times to make sure it is nice and damp. At this point do not touch the clay any more. The substrate will now be quite soft and the cube structure will easily deform into a big muddy mass if handled. This would hurt the clay’s ability to drain and also diminish the surface area for microfauna to thrive. Once you have moistened your clay, cover it with a layer of leaf litter and leave it for your frogs to enjoy. In some cases you may intentionally leave an exposed area of clay as a feeding station. Generally, I’ve found that step unnecessary as most small frog species, particularly young frogs, spend quite a bit of their time hunting through and under the leaf litter anyway and will naturally expose themselves to the clay.
Springtails
Recently clay springtail cultures have become very popular, and for good reason. Springtails seem to thrive on clay at least as well as with more traditional substrates (charcoal) and clay cultures have the added benefit of being extremely easy to feed out of. The clay sticks to the bottom of the container and you can just turn it upside down and tap the springtails out. No more using straws to blow springtails off of a flooded culture or tapping off individual pieces of charcoal!
How To Make a Clay Springtail Culture:
This is very simple. Grab a deli cup. It could be 8, 16, or 32 oz but you’ll only need the bottom inch or so of the container. Add about 4 ounces of calcium bearing clay and get it wet. Add water at 2:1 (by weight) ratio to the clay. So for 4 ounces of clay, add 2 ounces of water. After a few minutes the clay pellets will absorb the water and be at about the right dampness for adding springtails. Press the clay into the bottom of the container. You want to do this firmly enough that it will stick well to the bottom but not so much that it completely flattens the cube texture of the clay (this allows more surface area for the springtails). This isn’t really that critical since the springtails will actually begin tunnelling through the clay and making their own additional surface area. Another easy way to do this is to firmly tap the bottom of the container against the floor or counter top to seat the clay into the cup. Now just dump in some springtails and your preferred springtail food. I personally like using active dry yeast. I feed about once per week. Feed lightly in the beginning. You can increase the amount as the culture gets established and begins growing.
In our experience the cultures do better with little to practically no ventilation. Just a solid deli cup lid with no holes or mesh seems to work best. Any significant air exchange can allow the clay to dry out. Just be careful not to overfeed, particularly active yeast, as this could gas the culture with CO2.
I hope this has been helpful in getting you started with calcium bearing clay substrate. If you have any other questions, please feel free to contact us!